Getting started
Overview
Label Studio is a self-contained Web application for multi-typed data labeling and exploration. The backend is written in pure Python powered by Flask. The frontend part is a backend-agnostic React + MST app, included as a precompiled script.
Here are the main concepts behind Label Studio’s workflow:

- Tasks represent an individual dataset items. Label Studio is a multi-type labeling tool - you can import either text, image, audio URL, HTML text or any number and combination of these data resources.
- Completions are the labeling results in JSON format. They could be exported in various common formats, ready to use in machine learning pipelines.
- Predictions are the optional labeling results in the same format, but unlike completions they are used for generating pre-labeling during the annotation process, or validating the model predictions.
- Machine learning backend connects popular machine learning frameworks to Label Studio for active learning & generating model predictions on-the-fly.
- Labeling config is a simple XML tree with tags used to configure UI elements, connect input data to output labeling scheme.
- Project encompasses tasks, config, predictions and completions all-in-one in an isolated directory
- Frontend Labeling UI is accessible from any browser, distributed as precompiled js/css scripts and could be easily extendable with new labeling tags. You can also embed Label Studio UI into your applications.
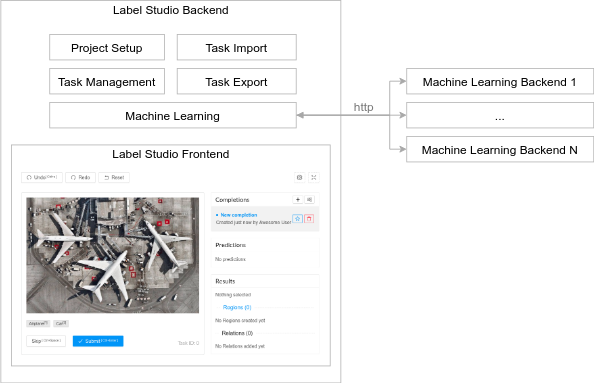
Main modules
The main modules of LS are
- Label Studio Backend (LSB, main repository)
- Label Studio Frontend (LSF, editor)
- Machine Learning Backends (MLB)
Relations among tasks, completions and results
Here you can see relations among labeling objects: tasks, completions, results, etc.
One user provides one completion, it’s atomic, and it consists of the result items. Result items can have relations between themselves with the specified direction of three types: left-right, right-left, or bidirectional. Normalizations are additional information in the custom string format about the current result item.
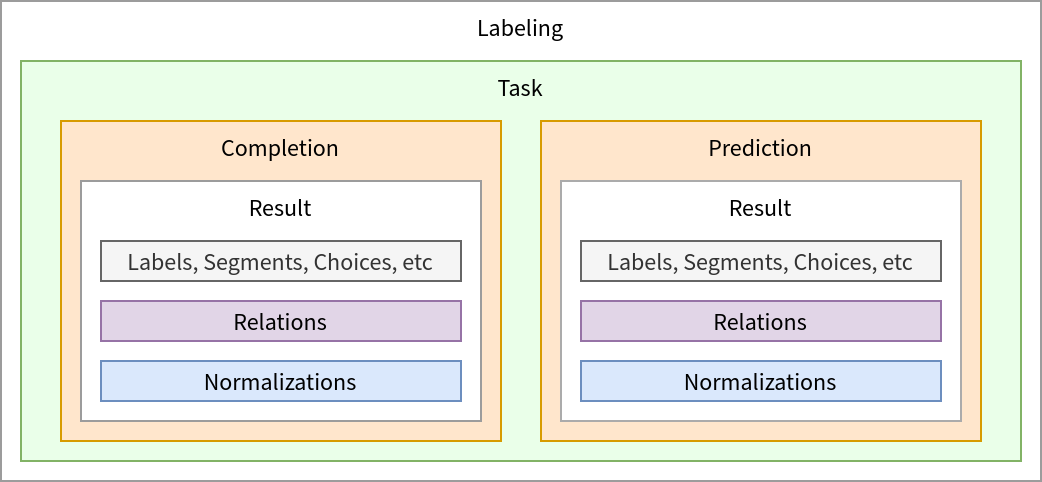
Completions and Predictions are very similar. But predictions must be generated automatically by ML models.
Usage statistics
Label Studio collects anonymous usage statistics without any sensitive info about page request number and data types from the labeling config. It helps us to improve the labeling quality and gives a better understanding about the next development.
Quickstart
Prerequisites
Label Studio is supported for Python 3.5 or greater, running on Linux, Windows and MacOSX.
Note: for Windows users the default installation may fail to build
lxmlpackage. Consider manually installing it from unofficial Windows binaries e.g. if you are running on x64 with Python 3.8, runpip install lxml‑4.5.0‑cp38‑cp38‑win_amd64.whl.
Running with pip
To install Label Studio via pip, you need Python>=3.5 and run:
pip install label-studioThen launch a new project which stores all labeling data in a local directory my_project:
label-studio start my_project --initThe default browser opens automatically at http://localhost:8080.
Running with Docker
Label Studio is also distributed as a docker container. Make sure you have Docker installed on your local machine.
Install and start Label Studio at http://localhost:8080 storing all labeling data in ./my_project directory:
docker run --rm -p 8080:8080 -v `pwd`/my_project:/label-studio/my_project --name label-studio heartexlabs/label-studio:latestNote: if
./my_projectthe folder exists, an exception will be thrown. Please delete this folder or use--forceoption.
Note: for Windows, you have to modify the volumes paths set by-voption
You can override the default startup command by appending any of available command line arguments:
docker run -p 8080:8080 -v `pwd`/my_project:/label-studio/my_project --name label-studio heartexlabs/label-studio:latest label-studio start my_project --init --force --template image_mixedlabelIf you want to build a local image, run:
docker build -t heartexlabs/label-studio:latest .Running from source
If you want to use nightly builds, or extend the functionality, consider to download the source code using Git and run Label Studio locally:
git clone https://github.com/heartexlabs/label-studio.git
cd label-studio
python setup.py develop
Then create a new project, it stores all labeling data in a local directory my_project:
label-studio start my_project --initThe default browser will open automatically at http://localhost:8080.
Multisession mode
You can start Label Studio in multisession mode - each browser session creates it’s own project with associated session ID as a name.
In order to launch Label Studio in multisession mode and keep all projects in a separate directory session_projects, run
label-studio start-multi-session --root-dir ./session_projectsCommand line arguments
You can specify input tasks, project config, machine learning backend and other options via the command line interface. Run label-studio start --help to see all available options.
Auth with login and password
You can restrict the access for LS instance with the basic HTTP auth.
label-studio start my_project --username user --password pwdOr put username and password in the project config.json.
{
 ...
 "username": "user",
 "password": "pwd",
 ...
}
For docker you need to setup environment variables
USERNAMEandPASSWORD
It will be the same username and password for all the users.
WSGIServer instead of Flask
Use --use-gevent option on start to enable WSGI server. It wraps around app.run with gevent’s WSGIServer to enable the server to better handle concurrent requests.
label-studio start test --use-geventHTTPS & SSL
You can enable https protocol for Flask or WSGIServer. You need to generate SSL certificate and key for it, e.g.:
openssl req -newkey rsa:2048 -nodes -keyout key.pem -x509 -days 365 -out certificate.pemThan you need to use --cert and --key option on start:
label-studio start test --cert certificate.pem --key key.pemHealth check
LS has a special endpoint for health checks:
/api/health